

Sunday, November 27, 2016
Peppermint Healing Salve - Dry Skin Relief
Winter has arrived, bringing dry skin with it! This salve, which smells like Christmas in heaven, provides relief from dry, winter skin and eczema. The mint in the salve helps soothe any inflammation, and peppermint is a perfect pick-me-up, so it's naturally perfect for soreness and headaches. Your hands will smell wonderful, skin moisturized, and any mild pains relieved. Happy holiday season!

Monday, November 21, 2016
Anti-Nausea Kit / Pregnancy Care Package
Introducing: The Anti-Nausea Kit (Pregnancy Care Package) - Perfect for anyone experiencing nausea, especially newly expectant mothers! Perfect for the easily car-sick or sea-sick or as a baby shower gift!

This package is perfect for anyone experiencing nausea, especially mamas feeling the morning sickness (aka all day sickness, am I right?)! The package includes our anti-nausea pops, ginger chews, ginger drops, and peppermint rooibos tea (caffeine free and widely considered safe during pregnancy, although with anything, it's always best to ask the doc). The perfect baby shower gift!
$20.00
Sunday, November 20, 2016
Ginger Drops - Candy Nausea Relief
Gourdgeously Good has created the perfect hybrid between our anit-nausea pops and our ginger chews: Ginger drops! These hard candies are delicious, but thanks to the fresh ginger we've mixed in, they also are an effective nausea relief aid. You'll notice a tingly, warm feeling as you let the sweet candy dissolve in your mouth. The warmth works its way down for soothing, nausea relief in your belly. It's wonderful.
You can also let the drops dissolve in your hot tea - like our peppermint rooibos tea, which is great for headaches - for added sweetness and health benefits!

You can also let the drops dissolve in your hot tea - like our peppermint rooibos tea, which is great for headaches - for added sweetness and health benefits!

Sunday, November 6, 2016
Ginger Chews!
Now announcing GINGER CHEWS! They taste amazing AND help settle an uneasy stomach. These are perfect for anyone experiencing nausea, especially expectant mothers, or anyone who likes delicious candy-like treats....


7 Chews for $5.00
Saturday, October 15, 2016
Sage Cough Syrup
Gourdgeously Good has come out with a new product! Drum roll please.... SAGE COUGH SYRUP! Genius. Research has shown that sage is great for memory retention and concentration. It is terrific for inflammatory issues, including arthritis. However, perhaps the best use and the reason we have used it for our cough syrup is that sage is known both for its antioxidant properties and its immune system boosting powers The antioxidant compounds in sage, such as rosmarinic acide, luteolin, and apigenin, all fight against the free radicals that work their way into the body. Sage keeps those radicals from creating oxidative stress in the heart, organs, skin, brain, etc. It's a lot of science talk, but basically sage is perfect for fighting against the harmful germs that are especially powerful come the beginning of a new season like autumn.


Sage Cough Syrup
Sunday, October 9, 2016
Peppermint Rooibos Tea
Today, we made peppermint rooibos tea. Those of you who have never tasted this blend before, you need to try this stuff! It combines the deep taste of dark teas without any bitterness and an almost candy cane minty freshness. I'd say it was "mind-blowing," since it really was amazing, but it had this calming effect, so it's more like "mind soothing." Beyond the fact that it was deliciously wonderful, it has a load of health and medicinal benefits.

Rooibos is great for relieving nagging headaches, stomach aches, sleeplessness, hypertension, allergies, and even premature aging! All these benefits are combined with peppermint's ability to improve digestion, boost the immune system, reduce pain and inflammation, relax the body and mind, cure bad breath, and help with weight loss. It also tastes amazing, possibly making it the best tea ever.
This blend is also widely considered safe during pregnancy, but it's always best to check with your doctor.
Saturday, October 1, 2016
All Natural Anti-Nausea / Morning Sickness Lollipops
Feel nauseated? Morning sickness? All day sickness? Ginger and mint are both amazing at relieving nausea, and now we have put our home-grown, organic, fresh-picked mint and ginger into some tasty portable lollipops that you can grab on the way out the door or as you settle in to watch a good show.

These are all-natural, no drug lollipops that actually take away the nausea and taste amazing. You can order them now below!
Sunday, September 25, 2016
How to Plant Marshmallow Seeds
Today, we planted marshmallow! These seeds need to be stratified and then scarified before planted. Stratifying can be quite the process, and seeds can be purchased pre-stratified. Scarifying is quite simple, and we'll walk you through that process and planting marshmallow seeds in this step-by-step guide; no worries!
Marshmallow roots and leaves are used primarily to reduce inflammation in the respiratory tract and stomach, meaning it's great for dry cough, bronchitis, sore throat, and stomach upset. It's also great for diarrhea, constipation, UTIs, and stones in the urinary tract. Additionally it can be put on scrapes and bruises to help them heal!
Step One: Get your stratified marshmallow seeds out! We started from seeds this time, but once you have an established plant you can use cuttings, which is also fun!

Step Two: Scarifying time! The seeds are fairly small, so put them on sanding block (or steady piece of sandpaper).


Step Four: Mix some potting soil with vermiculite, so your precious baby marshmallows with have good drainage.


Step Six: Put some dirt in your pot. Make sure to put in enough, since it will settle when watered, and you need it high enough that sun can get to the seedling when it sprouts.

Step Seven: Put your scarified marshmallow seeds in! Place them right on top of the soil. Then, bury them only enough that the seed is covered. Pat the soil so that the seed is secure. Water carefully and thoroughly.

All done! Just make sure to keep the soil moist and kept in good light. In about 2 weeks, you should see a baby marshmallow plant peeking out of the soil. Yay!
Want to pre-order some marshmallow tea? Let us know at GourdgeouslyGood@gmail.com.
Join our CSA!
Gourdgeously Good
Marshmallow roots and leaves are used primarily to reduce inflammation in the respiratory tract and stomach, meaning it's great for dry cough, bronchitis, sore throat, and stomach upset. It's also great for diarrhea, constipation, UTIs, and stones in the urinary tract. Additionally it can be put on scrapes and bruises to help them heal!
Step One: Get your stratified marshmallow seeds out! We started from seeds this time, but once you have an established plant you can use cuttings, which is also fun!

Step Two: Scarifying time! The seeds are fairly small, so put them on sanding block (or steady piece of sandpaper).

Step Three: Rub a piece of sandpaper across them - not too much though! Just a couple strokes.


Step Five: Measure out an appropriate amount of fertilizer and mix it into the soil. Adding good fertilizer to herbs is an important step, since they can kick the bucket pretty quickly when they aren't nourished enough and lack potency when they aren't happy.


Step Seven: Put your scarified marshmallow seeds in! Place them right on top of the soil. Then, bury them only enough that the seed is covered. Pat the soil so that the seed is secure. Water carefully and thoroughly.

Want to pre-order some marshmallow tea? Let us know at GourdgeouslyGood@gmail.com.
Join our CSA!
Gourdgeously Good
Sunday, September 18, 2016
How to Make Lemon Balm Tea - Contact Us for Organic, Fresh Lemon Balm!
Today, we made some lemon balm tea. It's known for its intense soothing powers - a great stress reliever, anxiety and insomnia killer, and indigestion soother. Not to mention, it smells like fresh picked lemons and has an amazing lemon taste. Basically, this tea is perfect for anyone who is prone to anxiety or needs to relax, especially at the end of a stressful day or anyone who loves lemon.
If you'd like to buy fresh lemon balm, contact us at GourdgeouslyGood@gmail.com and we'll get some to you right away!
Step One: Pick some lemon balm (or measure out a small bunch sent to you from us!).

Step Two: Put the leaves into an infuser.

Step Three: Let steep for 10 minutes.

Step Four: Enjoy your AMAZING, yummy tea and sense of blissful peace.

Lemon balm has so many wonderful benefits. The most popular use is its wonderful ability to calm anxiety and allow for restful sleep. However, it also helps the skin look younger, boosts alertness, supports the liver, is a great antioxidant, helps with memory, protects brain cells... The list goes on.
Let us know if you'd like some organic, fresh lemon balm or to join our CSA.
Contact us at GourdgeouslyGood@gmail.com.
Sunday, September 11, 2016
How To Store Dried Herbs
Okay, now that you have grown, harvested, and dried your herbs, what do you do with them? Well, there are many ways to store them. You could freeze them in little ice cubes or a yummy, perfectly portioned butter cube. However, I like to store mine in jars, so that I can break them up RIGHT before I cook with them, so that they keep their flavor the best. So, here's how I do it:
Step 1: Gather your supplies. You'll need your dried herbs (after about 3-4 weeks of drying, so that they literally crisp apart at the touch), scissors (for cutting stems), and a jar (or even a Ziploc bag).

Step 2: Pick the leaves off carefully where they meet the stem. It's better not to crumple them to bits, waiting until you actually use them. This keeps the flavor much longer.

Step 3: Put the leaves in a sealed jar. You can pretty it up if you wish. I chose not to this time. I honestly love the simplicity of a mason jar on its own with herbs showing through the glass.

- If short on time or effort level, you can also cut the stems up and place the branches into a Ziploc bag. No shame. You got the job done, and now you have yummy basil on hand.

Step 1: Gather your supplies. You'll need your dried herbs (after about 3-4 weeks of drying, so that they literally crisp apart at the touch), scissors (for cutting stems), and a jar (or even a Ziploc bag).

Step 2: Pick the leaves off carefully where they meet the stem. It's better not to crumple them to bits, waiting until you actually use them. This keeps the flavor much longer.

Step 3: Put the leaves in a sealed jar. You can pretty it up if you wish. I chose not to this time. I honestly love the simplicity of a mason jar on its own with herbs showing through the glass.


All done! Remember that dried herbs are much more potent than fresh ones, so even one jar full will last you quite a while!
Gourdgeously Good
GourdgeouslyGood@gmail.com
571-340-5592
Friday, August 19, 2016
How To Dry Herbs
So today, I finally cut my basil. I absolutely love drying herbs. It smells SO GOOD, and basil is one of my favorites, because you feel like you are in an Italian restaurant. The down side is you start to feel extremely hungry with an overpowering desire for a gigantic plate of pasta. Dried herbs have twice the strength of fresh herbs when they are done right, so if you have a bunch growing the benefit is two-fold: delight for the nose while growing and delight for the taste buds when dried (although they are great fresh, too!).
You dry basil the same way you dry any herb, really. You grab some scissors and venture off to where you keep your herbs (garden, pots outdoors, pots indoors... Herbs are so great). It's best if you harvest before it starts flowering You snip off however much you want (later I can show you where to cut to make the pant grow more twice as fast!), and head back to the kitchen.
You'll need the following:
- A bundle of basil (or whatever herb you want to dry today)
- a piece of string
Here we go.
Step 1: Wash your herbs (so you don't have bugs crawling around the house)

Step 2: Lay out your herbs and your string in order to gauge what you are working with. Pick out any leaves that are burnt or just not looking like they are feeling well.


Step 3: Pick up a bundle and tie the string tightly around one end of the stems. You want to make sure it's tight, so when the basil starts to dry, you don't have dried leaves falling onto your floor.
Step 4: I tied my bundles on both sides of a long piece of string since I had so much that needed to be dried, but there's no need to do it this way. Just needs to hang somewhere away from a window/direct source of light and where air circulates. (If that's not possible, just put a paper bag around the herbs so the light doesn't hit).


It'll take about 4 weeks to dry. When you store it, the best way is to store as whole stems or leaves - don't break up the leaves, if possible, until you actually are using them. It keeps its flavor better the more it's in tact. I like to store mine in mason jars, but any air tight container works!
Join our CSA!
You dry basil the same way you dry any herb, really. You grab some scissors and venture off to where you keep your herbs (garden, pots outdoors, pots indoors... Herbs are so great). It's best if you harvest before it starts flowering You snip off however much you want (later I can show you where to cut to make the pant grow more twice as fast!), and head back to the kitchen.
You'll need the following:
- A bundle of basil (or whatever herb you want to dry today)
- a piece of string
Here we go.
Step 1: Wash your herbs (so you don't have bugs crawling around the house)

Step 2: Lay out your herbs and your string in order to gauge what you are working with. Pick out any leaves that are burnt or just not looking like they are feeling well.


Step 3: Pick up a bundle and tie the string tightly around one end of the stems. You want to make sure it's tight, so when the basil starts to dry, you don't have dried leaves falling onto your floor.
 |
| My daughter is waiting for an opportunity to grab a leaf so she can eat it. The girl loves fresh basil. |
Step 4: I tied my bundles on both sides of a long piece of string since I had so much that needed to be dried, but there's no need to do it this way. Just needs to hang somewhere away from a window/direct source of light and where air circulates. (If that's not possible, just put a paper bag around the herbs so the light doesn't hit).


It'll take about 4 weeks to dry. When you store it, the best way is to store as whole stems or leaves - don't break up the leaves, if possible, until you actually are using them. It keeps its flavor better the more it's in tact. I like to store mine in mason jars, but any air tight container works!
Join our CSA!
Gourdgeously Good
GourdgeouslyGood@gmail.com
571-340-5592
Tuesday, August 16, 2016
How To Save Tomato Seeds - Stage 3 (Storing)
Join our CSA! Click here.
Yay! Now that it's been at least a week, I can finally store my seeds.
Step 1: Make sure your seeds are bone dry. If there is ANY moisture left, wait a few days.

Step 2: Pick your packet. Paper packets are best, since plastic/glass make any moisture become dangerous, which cause rot, mildew, and an unhappy seed-saving gardener. Also, paper packets give you an opportunity to be a crafty, recycling, and overly proud of yourself! ... Orrrr you can just stick them in an actual paper envelope. Totally boring, simple, and logical.
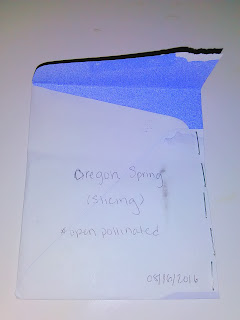
Step 3: Label your new handy dandy seed packet (specify the type of tomato if you know it and perhaps how many seeds), and stick the seeds into it.

Step 4: Brag to the world, or there are actually quite a few of seed swapping groups if you want to swap a packet. After all, you can just make another one!

High five, you seed-saving fiend! You did it!
Join our CSA! Click here.
Gourdgeously Good
GourdgeouslyGood@gmail.com
Tuesday, August 9, 2016
How To Save Tomato Seeds - Stage 2
Now that your seeds have had a chance to ferment a bit (which is important to help prevent diseases, so don't skip that step!), you can now get them out of that goopy, watery mixture, so they can dry. Yay!
Step 1: First, you want to take the cover off, of course. You're looking for a sort of grimy layer on top.


Step 1: First, you want to take the cover off, of course. You're looking for a sort of grimy layer on top.

Step 2: Carefully remove this grimy layer. It'll be thin. Make sure not to grab any seeds, which should have sunk to the bottom, mostly.

Step 3: Once the layer is removed, you are going to start the separating process. You'll need a sieve of some kind that has tiny, tiny holes - you don't want the seeds to wash right through! I was nervous the holes of mine were too big for these seeds, so I put a paper towel on top and poured water over it. I squeezed the water out and picked out any big tomato-ey clumps.

Then, I put a small, clear plastic plate underneath the sieve, and slipped the seeds out of the towel and directly into the sieve.

Give it a good rinse and make sure you've got nothing but seeds left!
Step 4: Carefully move the seeds onto wax paper or towel on a plate and spread them into an even layer - none of the seeds should overlap each other.

Step 5: Let them dry. It'll take about a week (a few days more if it's a rainy week) to dry completely. You'll need to move them around each day so they dry on both sides completely.

Take a moment to admire those little guys. One day they will grow into nice big tomato plants that'll give you lots of yummy tomatoes....hopefully.
Happy seed saving! One more stage after this when we get to store them until next year!
Want to join our 2017 CSA? Click here.
Gourdgeously Good
GourdgeouslyGood@gmail.com
Friday, August 5, 2016
How To Save Tomato Seeds - Stage 1
So, today was the day I finally began saving my tomato seeds. I like to start with the biggest mama my garden has given me. There is something truly fulfilling and satisfying about taking a knife to a ridiculously large tomato. A tomato half the size of this lady would serve any purpose one would need from a tomato, but that didn't stop the smile from stretching across my face as the warm yet exhilarating feeling spread from my tomato-filled hand, up my arm, and into my chest.
Truthfully, there is probably something wrong with me that I get this excited about a tomato.
Now that I have explained my weird feelings about garden tomatoes, I will go into detail about how to butcher one in order to save its insides, so as to plant more next year! It's a complicated relationship.
Step 1: Pick your victim. Pick a tomato from a plant that has given you tasty tomatoes thus far this season. (Not necessarily the biggest ones!).

Step 2: Slice it in half LENGTHWISE, as if slicing a globe along its equator, NOT pole to pole.

Step 3: Spoon out the seeds. You'll get goop and juice along with them. That's okay.

Step 4: Put the seeds (and attached goop) into a jar. Once all the seeds are gathered and in the jar, add a tablespoon or two of water. This will help separate the seeds from the goop as it ferments.


Step 6: Place jar in a warm area. Usually the top of the fridge will do. Just make sure they are away from direct sunlight. Sunlight is fine, just not too direct.

Truthfully, there is probably something wrong with me that I get this excited about a tomato.
Now that I have explained my weird feelings about garden tomatoes, I will go into detail about how to butcher one in order to save its insides, so as to plant more next year! It's a complicated relationship.
Step 1: Pick your victim. Pick a tomato from a plant that has given you tasty tomatoes thus far this season. (Not necessarily the biggest ones!).


Step 4: Put the seeds (and attached goop) into a jar. Once all the seeds are gathered and in the jar, add a tablespoon or two of water. This will help separate the seeds from the goop as it ferments.


Step 5: Place cling wrap over the jar tightly and poke some holes in it.


Step 6: Place jar in a warm area. Usually the top of the fridge will do. Just make sure they are away from direct sunlight. Sunlight is fine, just not too direct.

The next steps:
Each night you'll need to give the mix a stir and put the wrap back on. It'll take about 3 nights. Eventually you'll get a scummy looking surface that'll tell you the seeds are ready to take out. I'll be sure to update you on my seeds, so you can get a visual step-by-step! Happy seed saving!
Gourdgeously Good
GourdgeouslyGood@gmail.com
Join our CSA!
Subscribe to:
Posts (Atom)