Friday, August 19, 2016

How To Dry Herbs

So today, I finally cut my basil. I absolutely love drying herbs. It smells SO GOOD, and basil is one of my favorites, because you feel like you are in an Italian restaurant. The down side is you start to feel extremely hungry with an overpowering desire for a gigantic plate of pasta. Dried herbs have twice the strength of fresh herbs when they are done right, so if you have a bunch growing the benefit is two-fold: delight for the nose while growing and delight for the taste buds when dried (although they are great fresh, too!).
You dry basil the same way you dry any herb, really. You grab some scissors and venture off to where you keep your herbs (garden, pots outdoors, pots indoors... Herbs are so great). It's best if you harvest before it starts flowering You snip off however much you want (later I can show you where to cut to make the pant grow more twice as fast!), and head back to the kitchen.

You'll need the following:
     - A bundle of basil (or whatever herb you want to dry today)
     - a piece of string

Here we go.

Step 1: Wash your herbs (so you don't have bugs crawling around the house)

Step 2: Lay out your herbs and your string in order to gauge what you are working with. Pick out any leaves that are burnt or just not looking like they are feeling well.


Step 3: Pick up a bundle and tie the string tightly around one end of the stems. You want to make sure it's tight, so when the basil starts to dry, you don't have dried leaves falling onto your floor.

My daughter is waiting for an opportunity to grab a leaf so she can eat it. The girl loves fresh basil.

Step 4: I tied my bundles on both sides of a long piece of string since I had so much that needed to be dried, but there's no need to do it this way. Just needs to hang somewhere away from a window/direct source of light and where air circulates. (If that's not possible, just put a paper bag around the herbs so the light doesn't hit).


It'll take about 4 weeks to dry. When you store it, the best way is to store as whole stems or leaves - don't break up the leaves, if possible, until you actually are using them. It keeps its flavor better the more it's in tact. I like to store mine in mason jars, but any air tight container works!

Join our CSA!

Gourdgeously Good

GourdgeouslyGood@gmail.com
571-340-5592

Tuesday, August 16, 2016

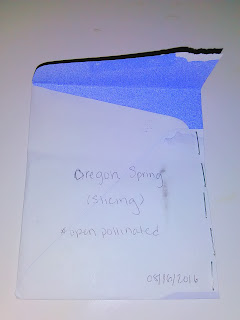
How To Save Tomato Seeds - Stage 3 (Storing)

Join our CSA! Click here.


Yay! Now that it's been at least a week, I can finally store my seeds.

Step 1: Make sure your seeds are bone dry. If there is ANY moisture left, wait a few days.


Step 2: Pick your packet. Paper packets are best, since plastic/glass make any moisture become dangerous, which cause rot, mildew, and an unhappy seed-saving gardener. Also, paper packets give you an opportunity to be a crafty, recycling, and overly proud of yourself! ... Orrrr you can just stick them in an actual paper envelope. Totally boring, simple, and logical.


Step 3: Label your new handy dandy seed packet (specify the type of tomato if you know it and perhaps how many seeds), and stick the seeds into it.


Step 4: Brag to the world, or there are actually quite a few of seed swapping groups if you want to swap a packet. After all, you can just make another one!


High five, you seed-saving fiend! You did it!

Join our CSA! Click here.

Gourdgeously Good
GourdgeouslyGood@gmail.com

Tuesday, August 9, 2016

How To Save Tomato Seeds - Stage 2

Now that your seeds have had a chance to ferment a bit (which is important to help prevent diseases, so don't skip that step!), you can now get them out of that goopy, watery mixture, so they can dry. Yay!

Step 1: First, you want to take the cover off, of course. You're looking for a sort of grimy layer on top.

Step 2: Carefully remove this grimy layer. It'll be thin. Make sure not to grab any seeds, which should have sunk to the bottom, mostly. 


Step 3: Once the layer is removed, you are going to start the separating process. You'll need a sieve of some kind that has tiny, tiny holes - you don't want the seeds to wash right through! I was nervous the holes of mine were too big for these seeds, so I put a paper towel on top and poured water over it. I squeezed the water out and picked out any big tomato-ey clumps. 


Then, I put a small, clear plastic plate underneath the sieve, and slipped the seeds out of the towel and directly into the sieve. 


Give it a good rinse and make sure you've got nothing but seeds left!

Step 4: Carefully move the seeds onto wax paper or towel on a plate and spread them into an even layer - none of the seeds should overlap each other. 


Step 5: Let them dry. It'll take about a week (a few days more if it's a rainy week) to dry completely. You'll need to move them around each day so they dry on both sides completely. 


Take a moment to admire those little guys. One day they will grow into nice big tomato plants that'll give you lots of yummy tomatoes....hopefully.

Happy seed saving! One more stage after this when we get to store them until next year!

Want to join our 2017 CSA? Click here. 

Gourdgeously Good
GourdgeouslyGood@gmail.com

Friday, August 5, 2016

How To Save Tomato Seeds - Stage 1

      So, today was the day I finally began saving my tomato seeds. I like to start with the biggest mama my garden has given me. There is something truly fulfilling and satisfying about taking a knife to a ridiculously large tomato. A tomato half the size of this lady would serve any purpose one would need from a tomato, but that didn't stop the smile from stretching across my face as the warm yet exhilarating feeling spread from my tomato-filled hand, up my arm, and into my chest.
     Truthfully, there is probably something wrong with me that I get this excited about a tomato.

   Now that I have explained my weird feelings about garden tomatoes, I will go into detail about how to butcher one in order to save its insides, so as to plant more next year! It's a complicated relationship.

Step 1: Pick your victim. Pick a tomato from a plant that has given you tasty tomatoes thus far this season. (Not necessarily the biggest ones!).


 Step 2: Slice it in half LENGTHWISE, as if slicing a globe along its equator, NOT pole to pole.


 Step 3: Spoon out the seeds. You'll get goop and juice along with them. That's okay.


Step 4: Put the seeds (and attached goop) into a jar. Once all the seeds are gathered and in the jar, add a tablespoon or two of water. This will help separate the seeds from the goop as it ferments.


Step 5: Place cling wrap over the jar tightly and poke some holes in it. 

Step 6: Place jar in a warm area. Usually the top of the fridge will do. Just make sure they are away from direct sunlight. Sunlight is fine, just not too direct.

The next steps:

Each night you'll need to give the mix a stir and put the wrap back on. It'll take about 3 nights. Eventually you'll get a scummy looking surface that'll tell you the seeds are ready to take out. I'll be sure to update you on my seeds, so you can get a visual step-by-step! Happy seed saving!

Gourdgeously Good

GourdgeouslyGood@gmail.com
Join our CSA!